2013年11月20日 星期三

[C#] 將現有節點從一個文件複製到另一個文件;ImportNode

在C#中,建立xml要先建立XmlDocument,在裡面再建立XmlElement
若想要將其中的節點,複製到其他XmlDocument可不能直接放
需使用ImportNode複製到其他的XmlDocument

using System;
using System.Collections.Generic;
using System.Linq;
using System.Threading.Tasks;
using System.Windows.Forms;
using System.Xml;

namespace qntest1
{
    static class Program
    {
        /// 
        /// 應用程式的主要進入點。
        /// 
        [STAThread]
        static void Main()
        {
            //Application.EnableVisualStyles();
            //Application.SetCompatibleTextRenderingDefault(false);
            //Application.Run(new Form1());
            xml();
        }

        static void xml()
        {
            //建立時間放在檔名
            DateTime dt = DateTime.Now;
            string time = string.Format("{0:yyyyMMddHHmmssffff}", dt);

            //新增第一個xml檔
            XmlDocument doc = new XmlDocument();
            XmlDeclaration xmlDeclaration = doc.CreateXmlDeclaration("1.0", "UTF-8", null);
            doc.AppendChild(xmlDeclaration);
            XmlElement rootElement = doc.CreateElement("Company1");
            doc.AppendChild(rootElement);

            //新增資料
            XmlElement childElement = doc.CreateElement("Employee");
            XmlAttribute childAtrbt = doc.CreateAttribute("Department");
            childAtrbt.Value = "研發部";
            childElement.Attributes.Append(childAtrbt);
            rootElement.AppendChild(childElement);

            doc.Save(@"C:\Users\user\Desktop\test\" + "test_" + time + ".xml");

            //////////////////////////////////////////////////////////////////////////////////////

            //新增第二個xml檔
            XmlDocument doc2 = new XmlDocument();
            XmlDeclaration xmlDeclaration2 = doc2.CreateXmlDeclaration("1.0", "UTF-8", null);
            doc2.AppendChild(xmlDeclaration2);

            XmlElement rootElement2 = doc2.CreateElement("Company2");
            doc2.AppendChild(rootElement2);

            //將第一個xml檔最後的節點複製到第二個xml檔
            XmlNode newNode = doc2.ImportNode(doc.DocumentElement.LastChild, true);
            doc2.DocumentElement.AppendChild(newNode);

            doc2.Save(@"C:\Users\user\Desktop\test\" + "test.copy_" + time + ".xml");
        }
    }
}


test_201311201933485572.xml
   
- 


test.copy_201311201933485572.xml
   
- 


[git][cygwin] git config

Git的設定有三種層級,分別是
1. /etc/gitconfig:系統,適用所有使用者及所有repositories;git config --system [command]
2. ~/.gitconfig:使用者,適用於該使用者;git config --global [command]
3. repositories/.git/config:repositories,適用於該repositories;git config [command]

一般用第二個,給自己的帳戶使用

/home/user/.gitonfig
[user]
        name = user
        email = user@email.com
[color]
        diff = auto
        status = auto
        branch = auto
        ui = auto 
[core]
        editor = nano
        autocrlf = false

[user] name, email:name為使用git commit會儲存的name及email
[color] 如果有需要可以填
[core] editor:編輯器若沒有指定會使用系統預設的,通常是vi或vim
[core] autocrlf:在不同作業系統(ex: Windows, Linux)換行字元會不同,若設定true,它會自動切換換行字元(crlf, lf)。
在Windows我使用cygwin,作為使用git的工具,為了避免換行字元會因為不同作業系統而改變,因此我設為false,依照codebase原有的換行字元


※ ref1:http://git-scm.com/book/en/Getting-Started-First-Time-Git-Setup
※ ref2:http://huan-lin.blogspot.com/2011/05/git-coreautocrlf.html

[Linux] 在目錄之下搜尋文件檔名及文件內關鍵字

在目錄之下,搜尋文件檔名
$ find -iname "[file_name]"
EX: $ fine iname "*.txt"

在目錄之下,搜尋文件關鍵字
$ grep -rin "[keyword]" .
EX: $ grep -rin "HelloWord()" .

2013年11月13日 星期三

[Linux] Ubuntu 12.04的下載來源

若是預設的下載來源會讓平時apt-get install下載時找不到檔案
那麼可以將下載來源換成以下
修改/etc/apt/source.list
#deb cdrom:[Ubuntu 12.04.1 LTS _Precise Pangolin_ - Release amd64 (20120823.1)]/ dists/precise/main/binary-i386/

#deb cdrom:[Ubuntu 12.04.1 LTS _Precise Pangolin_ - Release amd64 (20120823.1)]/ dists/precise/restricted/binary-i386/
#deb cdrom:[Ubuntu 12.04.1 LTS _Precise Pangolin_ - Release amd64 (20120823.1)]/ precise main restricted

# See http://help.ubuntu.com/community/UpgradeNotes for how to upgrade to
# newer versions of the distribution.
deb http://tw.archive.ubuntu.com/ubuntu/ precise main restricted
deb-src http://tw.archive.ubuntu.com/ubuntu/ precise main restricted

## Major bug fix updates produced after the final release of the
## distribution.
deb http://tw.archive.ubuntu.com/ubuntu/ precise-updates main restricted
deb-src http://tw.archive.ubuntu.com/ubuntu/ precise-updates main restricted

## N.B. software from this repository is ENTIRELY UNSUPPORTED by the Ubuntu
## team. Also, please note that software in universe WILL NOT receive any
## review or updates from the Ubuntu security team.
deb http://tw.archive.ubuntu.com/ubuntu/ precise universe
deb-src http://tw.archive.ubuntu.com/ubuntu/ precise universe
deb http://tw.archive.ubuntu.com/ubuntu/ precise-updates universe
deb-src http://tw.archive.ubuntu.com/ubuntu/ precise-updates universe

## N.B. software from this repository is ENTIRELY UNSUPPORTED by the Ubuntu 
## team, and may not be under a free licence. Please satisfy yourself as to 
## your rights to use the software. Also, please note that software in 
## multiverse WILL NOT receive any review or updates from the Ubuntu
## security team.
deb http://tw.archive.ubuntu.com/ubuntu/ precise multiverse
deb-src http://tw.archive.ubuntu.com/ubuntu/ precise multiverse
deb http://tw.archive.ubuntu.com/ubuntu/ precise-updates multiverse
deb-src http://tw.archive.ubuntu.com/ubuntu/ precise-updates multiverse

## N.B. software from this repository may not have been tested as
## extensively as that contained in the main release, although it includes
## newer versions of some applications which may provide useful features.
## Also, please note that software in backports WILL NOT receive any review
## or updates from the Ubuntu security team.
deb http://tw.archive.ubuntu.com/ubuntu/ precise-backports main restricted universe multiverse
deb-src http://tw.archive.ubuntu.com/ubuntu/ precise-backports main restricted universe multiverse

deb http://security.ubuntu.com/ubuntu precise-security main restricted
deb-src http://security.ubuntu.com/ubuntu precise-security main restricted
deb http://security.ubuntu.com/ubuntu precise-security universe
deb-src http://security.ubuntu.com/ubuntu precise-security universe
deb http://security.ubuntu.com/ubuntu precise-security multiverse
deb-src http://security.ubuntu.com/ubuntu precise-security multiverse

## Uncomment the following two lines to add software from Canonical's
## 'partner' repository.
## This software is not part of Ubuntu, but is offered by Canonical and the
## respective vendors as a service to Ubuntu users.
# deb http://archive.canonical.com/ubuntu precise partner
# deb-src http://archive.canonical.com/ubuntu precise partner

## This software is not part of Ubuntu, but is offered by third-party
## developers who want to ship their latest software.
deb http://extras.ubuntu.com/ubuntu precise main
deb-src http://extras.ubuntu.com/ubuntu precise main


2013年11月1日 星期五

[Android][Example] 用SoundPool控制左右聲道

如果需要控制左右聲道的音量,SoundPool有提供這個功能
SoundPool的優點是可以同時撥好幾個音檔
但卻對音檔的大小有限制
因此只適合撥較短的音檔

以下範例UI會有左右聲道的播放及停止按鈕


activity_main.xml


MainActivity.java
package com.qn.leftrightsound;

import android.media.AudioManager;
import android.media.SoundPool;
import android.os.Bundle;
import android.app.Activity;
import android.util.Log;
import android.view.View;
import android.widget.Button;

public class MainActivity extends Activity {
    private String TAG = "leftrightsound";
    private SoundPool soundPool;
    private Button button_left_play, button_left_pause, button_right_play, button_right_pause;
    private int music_left, music_right;
    private int music_left_temp, music_right_temp;

    @Override
    protected void onCreate(Bundle savedInstanceState) {
        super.onCreate(savedInstanceState);
        setContentView(R.layout.activity_main);

        soundPool = new SoundPool(1, AudioManager.STREAM_MUSIC, 0);
        music_left = soundPool.load(this, R.raw.left_sound, 1);
        music_right = soundPool.load(this, R.raw.right_sound, 1);
        // 音樂檔案放在res/raw底下,預設沒有raw資料夾,要自己建

        button_left_play = (Button) findViewById(R.id.button_left_play);
        button_left_pause = (Button) findViewById(R.id.button_left_pause);
        button_right_play = (Button) findViewById(R.id.button_right_play);
        button_right_pause = (Button) findViewById(R.id.button_right_pause);

        button_left_play.setOnClickListener(ButtonListner);
        button_left_pause.setOnClickListener(ButtonListner);
        button_right_play.setOnClickListener(ButtonListner);
        button_right_pause.setOnClickListener(ButtonListner);
    }

    private Button.OnClickListener ButtonListner = new Button.OnClickListener() {

        @Override
        public void onClick(View v) {
            switch (v.getId()) {
                case R.id.button_left_play:
                Log.i(TAG, "press left play");
                music_left_temp = soundPool.play(music_left, 1, 1, 0, 0, 1);
                // 由於每次播放的id會不同,為考慮到按下暫停是要暫停剛剛播放的,因此將每次播放的id存起來
                // play()
                // 第一參數為音檔id
                // 第二.三參數為左右聲道的音量,range = 0.0 to 1.0
                // 第四參數為優先權,若不需設定可都設為0,0為最小優先權
                // 第五參數為loop,0 = no loop, -1 = loop forever
                // 第六參數為速度,1.0 = normal playback, range 0.5 to 2.0
                break;
            case R.id.button_left_pause:
                Log.i(TAG, "press left pause");
                soundPool.stop(music_left_temp);
                 break;
            case R.id.button_right_play:
                Log.i(TAG, "press right play");
                music_right_temp = soundPool.play(music_right, 0, 1, 0, 0, 1);
                break;
            case R.id.button_right_pause:
                Log.i(TAG, "press right pause");
                soundPool.stop(music_right_temp);
                break;
            }
        }
    };

    @Override
    protected void onDestroy() {
        this.soundPool.release();
         super.onPause();
    }

}

2013年10月21日 星期一

[Batch] call的用法,call與goto的差別

call可用在執行其他batch檔
也可以執行寫好的function(在batch稱為label)

Ex1:
ECHO CALL example1
CALL test1.bat

Ex2:
ECHO CALL example2
CALL :test2

:test2
ECHO This is test2


goto也可以執行寫好的function
但call與goto兩者最大差別為
call跳到label後,執行完label中的程式碼,會跳回call之後的程式碼
但goto跳到label後,並不會跳回來

此外
call後面可接傳入function的參數

Ex3:
ECHO CALL example3
CALL :test3 100

:test3
ECHO This is test3
ECHO %1%


refs: http://ccd9527.blogspot.tw/2010/11/bat-call-06.html

2013年10月4日 星期五

[Linux] 製作patch;打patch

1. 製作patch
使用linux的diff指令,diff舊檔案及新檔案的差別,並輸出成.patch
$ diff -Naur [old_file] [new_file] > [patch_name].patch

2. 打patch
使用linux的patch指令,將patch內容更新舊檔案
$ patch -p0 < [patch_name].patch
將檔案復原
$ patch -R -p0 < [patch_name].patch

2013年10月3日 星期四

[Linux] 計算資料夾或檔案大小

計算資料夾或檔案大小
後面可以接資料夾或檔案,否則則為當下資料夾
$ du -h

[Android] 檢查apk sign的key

與sign key一樣使用java的指令 -- jarsigner

$ jarsigner -verify -verbose -certs [apk_name]

會列出來像是以下的資訊
sm      3512 Mon Apr 15 00:13:32 CST 2013 AndroidManifest.xml

      X.509, CN=Android Debug, O=Android, C=US
      [certificate is valid from 2013/4/14 下午 3:10 to 2043/4/7 下午 3:10]

sm      5937 Sun Apr 14 15:09:46 CST 2013 res/drawable-xhdpi/ic_launcher.png

      X.509, CN=Android Debug, O=Android, C=US
      [certificate is valid from 2013/4/14 下午 3:10 to 2043/4/7 下午 3:10]

如果用Android test key sign過的apk結果會長這樣
sm      3875 Wed Apr 16 07:40:50 CST 2008 res/drawable-hdpi/rbt_icon.png

      X.509, EMAILADDRESS=android@android.com, CN=Android, OU=Android, O=Android, L=Mountain View, ST=California, C=US
      [certificate is valid from 2008/4/16 上午 6:40 to 2035/9/2 上午 6:40]

sm      1765 Wed Apr 16 07:40:50 CST 2008 res/drawable-ldpi/rbt_icon.png

      X.509, EMAILADDRESS=android@android.com, CN=Android, OU=Android, O=Android, L=Mountain View, ST=California, C=US
      [certificate is valid from 2008/4/16 上午 6:40 to 2035/9/2 上午 6:40]

可以藉此得知apk是用哪一把key sign的

refs:http://www.cnblogs.com/not-code/archive/2011/05/15/2047057.html

2013年9月23日 星期一

2013年9月13日 星期五

[Gerrit][Git] 新增/刪除Branch

1). 在local端新增branch並切換

1.1). 新增branch,再切換到該branch
$ git branch [branch_name]
$ git checkout [branch_name]

1.2). 新增branch並直接切換到該branch
$ git checkout -b [branch_name]

1.2). 以某個tag為基準,新增branch並直接切換到該branch
$ git checkout [tag_name] -b [branch_name]


2). 在remote端新增branch
$ git push origin [local_branch_name]:[remote_branch_name]

3). 在local端刪除branch (-D為強制)
$ git branch -d [branch_name]
$ git branch -D [branch_name]

4). 在remote端刪除branch
$ git push origin :[branch_name]

※在Gerrit要刪除remote端的branch
在push的權限中,必須增加force push才能夠刪除

※新增branch
git branch [branch_name] [base_on_which_branch]
若是[base_on_which_branch]沒有寫,預設是master
若是此git沒有master branch,則後面沒寫會無法新增branch

2013年9月4日 星期三

[Gerrit] [Git] [Repo] 新增/刪除tag

1). 在local端新增tag
$ git tag -a [tag_name] [commit_id]

2). 在remote端新增tag
$ git push origin [tag_name]
$ git push origin --tag (一次將所有tag push上去)

3). 在local端刪除tag
 $ git tag -d [tag_name]

4). 在remote端刪除tag
$ git push origin :refs/tags/[tag_name]

//======================================

9/4新增repo的部份
在repo codebase之下的用法

1). 在local端新增tag
$ repo forall -c 'git tag [tag_name]'

2). 在remote端新增tag
$ repo forall -c 'git push --tags'

3). 在local端刪除tag
$ repo forall -c 'git tag -d [tag_name]'

4). 在remote端刪除tag(需取得gerrit權限,目前沒嘗試過)
$ repo forall -c 'git push origin :refs/tags/[tag_name]'

[Gerrit] 在Gerrit網頁上加客製化修改

Gerrit網頁上方有能夠讓使用者客製化的區域
可藉由修改html檔,加上想要客製化的內容
請在放置gerrit的目錄底下的etc中增加GerritSiteHeader.html檔案
/home/gerrit/review_site/etc/GerritSiteHeader.html

內容請用<pre></pre>夾起來
example:
<pre>
Hello
World
</pre>

區域為底下圖片底色紅色的部份


2013年8月26日 星期一

[Gerrit] 解決Gerrit 2.5版本以上gitweb "404 no projects found"

Gerrit 2.5版以上有即使在All-Projects設了refs/*->read:allow
Gitweb仍舊會"404 no projects found"的bug

workround
在refs/meta/config->read:allow Project Owners
取消Exclusive的勾選
雖然被設定可讀權限的人可修改project access的狀況
但會以等待review方式呈現,且無submit的權限
所以暫時可以這個方式作為workaround

※refs:http://blog.sina.com.cn/s/blog_4fb490ff01018i0v.html

[Linux] 在Ubuntu上看影片;解決mplayer載入srt字幕亂碼

因為有在Ubuntu看影片的需求,搜尋了一下
在Linux中一個很強大的播放程式--mplayer

安裝
$ sudo apt-get install mplayer

播放
$ mplayer [檔名]
若有字幕,請放在同一個位置,並取與影片檔相同檔名

若srv字幕為繁體中文,通常編碼為big5
容易會有亂碼的情形發生
因此可在家目錄底下的.mplayer中找到config這隻檔案並修改
(若無,請建立$HOME/.mplayer/config)
font可在/usr/share/fonts/truetype搜尋字體並修改
subcp=cp950
unicode=yes
subfont-text-scale=3
font=/usr/share/fonts/truetype/arphic/ukai.ttc

2013年8月13日 星期二

[Linux][Windows] 使用vnc viewer遠端連線

本篇文章介紹兩種遠端連線
1. Linux -> Linux
2. Windows -> Linux

OS:
Ubuntu 12.04
Windows 7

//===========================================================

Linux -> Linux
假使我們要從電腦A連到電腦B

1. (電腦B) 設定可被遠端連線,搜尋桌面分享


2. (電腦B) 設定允許其他使用者觀看桌面,如果需要打密碼則設定密碼


3. (電腦A) 安裝gtk vnc viewer
$ sudo apte-get install gtkvncviewer

4. (電腦A) 搜尋gtk vnc viewer並打開程式


5. (電腦A) 輸入要遠端連線的ip位址,若有密碼則輸入密碼,點選連線


6. (電腦A) 連線的畫面


//===========================================================

Windows -> Linux
假使我們要從電腦A連到電腦B

1. (電腦B) 與上面敘述相同

2. (電腦A) 到官網下載vnc viewer
http://www.realvnc.com/download/viewer/

3. (電腦A) 打開程式並輸入要遠端連線的ip


4. (電腦A) 如果電腦B有設定密碼,在連線之後會跳出輸入密碼的視窗


5. (電腦A) 連線的畫面


2013年8月9日 星期五

[Windows][Player] 解決Media Player Classic(MPC-HC)播放影片上下

用Media Player Classic播放時若出線上下顛倒的情況
安裝K-Lite Mega Codec Pack即可以解決
http://www.free-codecs.com/download/k_lite_mega_codec_pack.htm

會出現先解除安裝Media Player Classic
之後安裝K-Lite Mega Codec Pack
會自動再裝Media Player Classic

2013年8月8日 星期四

[Linux] 強制踢出使用者

1). 搜尋使用者登入的process
$ ps -aux | grep -rin "account1"

2). 砍掉process
$ sudo kill [process_id]

2013年8月7日 星期三

[Linux][Git][Gerrit] 修改git clone codebase的名字

當從gerrit上git clone codebase時
有些server會檢查用戶name
若name不符合時則無法get code

此時可以在~/.ssh/config設置get code的名字
Hostname ip,ip,ip,ip
#若是需要設公司proxy
ProxyCommand connect -H ip.ip.ip.ip:port %h %p
User account1

EX: For gerrit
hostname ip,ip,ip,ip
port 29418
user account1

[Linux] 將帳號加入sudo權限

1. 修改/etc/group,將帳號加在sudo後
EX: sudo:x:27:account1,account2

2013年8月5日 星期一

[Linux] 設定系統proxy

1). 利用command方式設定proxy
$ export http_proxy=http://ip.ip.ip.ip:port/
$ export ftp_proxy=http://ip.ip.ip.ip:port/

2). 寫入bashrc
$ source ~/.bashrc

2013年8月2日 星期五

[Linux] 固定ip設定

1. 修改/etc/network/interfaces,僅留下以下資訊
auto lo
iface lo inet loopback
auto eth0
iface eth0 inet static
address  ip.ip.ip.ip
netmask 255.255.255.0
gateway ip.ip.ip.254
# dns-nameservers 10.110.15.1
# dns-nameservers 10.110.15.2

2. Ubuntu 12.04的dns改位置
舊版本修改/etc/resolv.conf
12.04需改在/etc/network/interfaces
dns-nameservers的部份

2013年7月31日 星期三

[Linux] 建立Soft Link

建立soft lint
$ ln -s [實際檔案的檔名] [連結的檔名]

[Linux] 架設Gerrit + LDAP auth

建立放置Gerrit的帳戶
1). sudo useradd -m -s /bin/bash gerrit
2). sudo passwd gerrit

安裝MySQL
1). 下載
sudo apt-get install mysql-server libapache2-mod-php5 libapache2-mod-auth-mysql php5-mysql
設定新建帳戶mysql密碼
※ MySQL-server: MySQL Server
※ libapache2-mod-php5: 把 Apache2 跟 PHP5 連接起來用的 Module
※ libapache2-mod-auth-mysql: MySQL for Apache HTTP Server
※ php5-mysql: MySQL for Apache HTTP Server
2). 建立初始值
 a). 以root登入
  mysql –u root -p
 b). 建立gerrit這個使用者帳號,且密碼為0000
  CREATE USER 'gerrit'@'localhost' IDENTIFIED BY '0000';
 c). 建立reviewdb這個資料庫
  CREATE DATABASE reviewdb;
 d). 設定資料庫的編碼方式為latin1
  ALTER DATABASE reviewdb charset=latin1;
 e). 將 reviewdb 資料庫權限,開給 gerrit@localhost
  GRANT ALL ON reviewdb.* TO 'gerrit'@'localhost';
 f). 載用新設好的權限
  FLUSH PRIVILEGES;

安裝Apache
1). 下載
sudo apt-get install apache2
2). 重開
sudo service apache2 restart

安裝PHP
1). 下載
sudo apt-get install php5
2). 測試方法: 在/var/www/中將以下程式碼新增成一隻檔案(.php),測試apache2能不能解讀php
<?php phpinfo(); ?>

安裝PHPmyAdmin (可有UI方式管理MySQL,網址是http://ip.ip.ip.ip/phpmyadmin)
1). 下載
sudo apt-get install phpmyadmin
2). 因為phpmyadmin並不是放在apache2預設目錄,需將phpmyadmin inclue到apache2,將以下程式碼加在apache2.config檔之後
sudo vi /etc/apache2/apache2.conf
Include /etc/phpmyadmin/apache.conf
3). 重開apache2
sudo service apache2 restart

安裝postfix mail system (與下面Exim4擇一,此在設定比較單純)
1). 下載
sudo apt-get install postfix

安裝Exim4 mail system (輕量級mail system)
1). 下載
sudo apt-get install exim4
2). 依照公司rule修改/etc/exim4/update-exim4.conf.conf
dc_eximconfig_configtype='smarthost'
dc_relay_domains='example.com'
dc_relay_nets='ip.ip.ip.ip'
dc_smarthost='example.com'

安裝Gerrit
1). 到官網下載,放在使用者gerrit家目錄
2). 切換到使用者gerrit
sudo su - gerrit
3). 安裝
java -jar gerrit-full-2.5.war init -d review_site
4). review_site/etc/gerrit.conf範本參考,修改完後須重新安裝,並打上LDAP AD帳號密碼及MySQL密碼
[gerrit]
  basePath = git
  canonicalWebUrl = http://ip.ip.ip.ip:8080/
[database]
  type = MYSQL
  hostname = localhost
  database = reviewdb
  username = gerrit
[auth]
  type = LDAP
  emailFormat = {0}@example.com
[ldap]
  server = ldap://ip.ip.ip.ip
  username = 公司網域\\公司AD帳號
  accountBase = OU=xxx,OU=xxx,DC=example,DC=com
  accountPattern = (&(objectClass=person)(sAMAccountName=${username}))
  accountFullName = displayName
  accountEmailAddress = ${mail.toLowerCase}
  accountMemberField = memberOf
  referral = follow
  groupBase = OU=xxx,OU=xxx,DC=example,DC=com
  groupPattern = (&(objectClass=group)(cn=${groupname}))
[sendemail]
  smtpServer = localhost
[container]
  user = gerrit_test
  javaHome = /usr/lib/jvm/java-6-sun-1.6.0.26/jre
[sshd]
  listenAddress = *:29418
[httpd]
  listenUrl = http://*:8080/
[cache]
  directory = cache

2013年7月29日 星期一

[JAVA] Thread中run()跟start()的差別

一個簡單的Thread宣告
Thread t1 = new Thread(new Runnable() {
 @Override
 public void run() {
  for (int i = 0; i <= 3; i++) {
   System.out.println("T1: " + i + ", Thread name: "
     + Thread.currentThread().getName());
  }
 }
});

Thread t2 = new Thread(new Runnable() {
 @Override
 public void run() {
  for (int j = 0; j <= 3; j++) {
   System.out.println("T2: " + j + ", Thread name: "
       + Thread.currentThread().getName());
  }
 }
});


要執行這個Thread有幾種方法
本文來比較run()跟start()的差異

//=============================================

1. run()
是由執行中的執行緒負責呼叫,也就是main
用這種方式呼叫,並沒有達到Thread的意義

假設使用run呼叫Thread
t1.run();
t2.run();
出來的結果
T1: 0, Thread name: main
T1: 1, Thread name: main
T1: 2, Thread name: main
T1: 3, Thread name: main
T2: 0, Thread name: main
T2: 1, Thread name: main
T2: 2, Thread name: main
T2: 3, Thread name: main


2. start()
由new Thread所建立的Thread負責執行

假設使用start()呼叫Thread
t1.start();
t2.start();
出來的結果,每條Thread會依據CPU分配的時間而有不同的執行順序
T1: 0, Thread name: Thread-0
T1: 1, Thread name: Thread-0
T2: 0, Thread name: Thread-1
T1: 2, Thread name: Thread-0
T2: 1, Thread name: Thread-1
T2: 2, Thread name: Thread-1
T1: 3, Thread name: Thread-0
T2: 3, Thread name: Thread-1

[Linux] 透過scp上傳下載檔案

若要上傳檔案到另外一台電腦
可透過scp的方式簡單的上傳過去

1. 上傳
$ scp [file_name] [account]@[ip]:[path]
EX: scp test.txt testcount@1.2.3.4:~
~為家目錄
將test.txt上傳到ip:1.2.3.4的家目錄中

2. 下載
$ scp [account]@[ip]:[path] [local_path]
EX: scp testcount@1.2.3.4:test.txt ~/temp
將ip:1.2.3.4家目錄的test.txt下載到自己電腦家目錄temp資料夾底下

2013年7月26日 星期五

[Linux] Ubuntu開機將kernel版本退版

若是當Ubuntu遇到無法開機進入桌面
可藉由在開機選單,選取較舊的kernel版本
使之正常開機

1. 疑似更新的關係,導致開機後變成這個畫面


2. 開機跑完電腦品牌的logo,按shift進入開機選單


3. 點選第三個


4. 選擇較舊的kernel版本


//===========================================

8/1 update

1. 列出現在使用的kernel
$ sudo uname -ra

2. 列出目前系統有的kernel image
$ sudo dpkg --list |grep linux-image

3. 刪除不要的kernel image
$ sudo apt-get purge linux-image-版號

2013年7月18日 星期四

[Linux][Android] 在Ubuntu12.04建置build code環境

OS: Ubuntu_12.04_64bit

1. 安裝build code環境
 $ sudo apt-get install git-core gnupg flex bison gperf build-essential zip curl libc6-dev libncurses5-dev:i386 x11proto-core-dev libx11-dev:i386 libreadline6-dev:i386 libgl1-mesa-glx:i386 libgl1-mesa-dev g++-multilib mingw32 openjdk-6-jdk tofrodos python-markdown libxml2-utils xsltproc zlib1g-dev:i386
 $ sudo ln -s /usr/lib/i386-linux-gnu/mesa/libGL.so.1 /usr/lib/i386-linux-gnu/libGL.so

2. gcc 4.4.X
由於新版的gcc會影響build code error,須降版成4.4.X
(code不夠嚴謹,跟不上gcc4.6)
 1). 安裝
  $ sudo apt-get install gcc-4.4 g++-4.4 gcc-4.4-multilib g++-4.4-multilib
 2). 設定gcc及g++的參數
  $ sudo update-alternatives --install \
    /usr/bin/gcc gcc /usr/bin/gcc-4.6 60 \
    --slave /usr/bin/g++ g++ /usr/bin/g++-4.6
  $ sudo update-alternatives --install \
    /usr/bin/gcc gcc /usr/bin/gcc-4.4 40 \
    --slave /usr/bin/g++ g++ /usr/bin/g++-4.4
 3). 選擇gcc-4.4
  $ sudo update-alternatives --config gcc

3. JDK
Ubuntu12.04預設是open jdk,需指定成sun jdk
可參考:http://qnworknote.blogspot.tw/2012/09/linux-java.html
由於android makefile只支援到1.6.X,建議用1.6.X版本
 1). 到官網下載6u45
  http://www.oracle.com/technetwork/java/javasebusiness/downloads/java-archive-downloads-javase6-419409.html#jdk-6u45-oth-JPR
 2). $ chmod u+x jdk-6u45-linux-x64.bin
  $ sudo ./jdk-6u45-linux-x64.bin
  $ sudo mkdir /usr/lib/jvm
  $ sudo cp -rf jdk1.6.0_45 /usr/lib/jvm/
  $ sudo update-alternatives --install "/usr/bin/java" "java" "/usr/lib/jvm/jdk1.6.0_45/bin/java" 1
  $ sudo update-alternatives --install "/usr/bin/javac" "javac" "/usr/lib/jvm/jdk1.6.0_45/bin/javac" 1
  $ sudo update-alternatives --install "/usr/lib/mozilla/plugins/libjavaplugin.so" "mozilla-javaplugin.so" "/usr/lib/jvm/jdk1.6.0_45/jre/lib/amd64/libnpjp2.so" 1
 3). 檢查各項目的優先順序是否正確

//====================================================

※額外補充:

1. 新增repo的環境變數
 1). 下載repo (也可以直接從網址下載)
  $ curl https://dl-ssl.google.com/dl/googlesource/git-repo/repo > .
 2). repo設為可執行
  $ chmod a+x repo
 3). 設為環境變數
  $ cp repo /usr/bin

2. 新增adb的環境變數
 1). 下載adt bundle,並取得adb
  從Android Developer下載adb bundle:http://developer.android.com/sdk/index.html
  adb位置:adt-bundle-linux-x86_64-20130219/sdk/platform-tools/adb
 2). 設為環境變數
  $ cd [PATH]/adt-bundle-linux-x86_64-20130219/sdk/platform-tools/
  $ cp adb /usr/bin

[Linux][JAVA] 指定JAVA位址

查看JAVA版本
$ java -version

指定JAVA軟體版本
使用update-alternatives來管理
例如有open jdk及sun jdk兩種版本,使用要使用哪種jdk

1). display,顯示此套件總共存有哪些路徑
sudo update-alternatives --display [name]
EX: sudo update-alternatives --display java

2). install,增加一組此套件
sudo update-alternatives --install [link] [name] [path] [priority]
EX: sudo update-alternatives --install /usr/bin/java java /home/qn_lo/WTS/java/jdk/bin/java 1062

3). remove,移除此套件
sudo update-alternatives --remove [name] [path]
EX: sudo update-alternatives --remove java /home/qn_lo/WTS/java/jdk/bin/java

4). config ,修改套件使用的優先權
sudo update-alternatives --config [name]
EX: sudo update-alternatives --config java


測試JAVA是否正常運作
http://www.java.com/zh_TW/download/testjava.jsp


//======================================

7/18補充
在Ubuntu 12.04建置Android build code環境,java部份

由於android makefile只支援到1.6.X,建議用1.6.X版本

1). 到官網下載6u32
http://www.oracle.com/technetwork/java/javase/downloads/jdk-6u32-downloads-1594644.html

2).
$ chmod u+x jdk-6u32-linux-x64.bin
$ sudo ./jdk-6u32-linux-x64.bin
$ sudo mkdir /usr/lib/jvm
$ sudo cp -rf jdk1.6.0_32 /usr/lib/jvm/
$ sudo update-alternatives --install "/usr/bin/java" "java" "/usr/lib/jvm/jdk1.6.0_32/bin/java" 1
$ sudo update-alternatives --install "/usr/bin/javac" "javac" "/usr/lib/jvm/jdk1.6.0_32/bin/javac" 1
$ sudo update-alternatives --install "/usr/lib/mozilla/plugins/libjavaplugin.so" "mozilla-javaplugin.so" "/usr/lib/jvm/jdk1.6.0_32/jre/lib/x64/libnpjp2.so" 1

3). 檢查各項目的優先權是否正確
EX: sudo update-alternatives --config [name]

2013年7月17日 星期三

[Linux] 改變Ubuntu桌面資料夾的路徑

Ubuntu在家目錄底下有預設幾個資料夾
可以將這些路徑換成自己想要的
ex: 桌面從中文『桌面』換成英文『desktop』

--

將ubuntu桌面資料夾等中文路徑改成英文路徑

cd ~
rm Desktop
mv 桌面 Desktop
mv 模板 Template
mv 公共 Public
mv 文件 Document
mv 音樂 Music
mv 圖片 Picture
mv 影片 Video
ln -s Desktop 桌面
ln -s Template 模板
ln -s Public 公共
ln -s Document 文件
ln -s Music 音樂
ln -s Picture 圖片
ln -s Video 影片
gedit ~/.config/user-dirs.dirs
將資料更改如下
XDG_DESKTOP_DIR="$HOME/Desktop"
XDG_DOWNLOAD_DIR="$HOME/Desktop"
XDG_TEMPLATES_DIR="$HOME/Template"
XDG_PUBLICSHARE_DIR="$HOME/Public"
XDG_DOCUMENTS_DIR="$HOME/Document"
XDG_MUSIC_DIR="$HOME/Music"
XDG_PICTURES_DIR="$HOME/Picture"
XDG_VIDEOS_DIR="$HOME/Video"
重新啟動Xwindow

sudo /etc/init.d/gdm restart

--

refs: https://wiki.ubuntu.com/TIPs_of_use_ubuntu

2013年6月5日 星期三

[Batch] 取得指令的結果

setlocal enabledelayedexpansion 變量延遲

@echo off
SETLOCAL ENABLEDELAYEDEXPANSION

adb.exe kill-server
adb.exe start-server

for /F %%i IN ('adb.exe shell getprop persist.sys.language') do (
SET language=%%i
)
echo !language!

2013年5月14日 星期二

[Batch] if exist路徑寫法;解決if else皆跑到的bug

IF EXIST的語法如下
IF EXIST "[PATH]" (
  echo a
) ELSE (
  echo b
)

A. PATH為已知路徑
 ex: C:\demo

1. 在xp更舊版本(實際版本不詳),必須在path前後,加雙引號
 ex: IF EXIST "C:\demo"
2. 在xp之後,在path前後可不加雙引號
 ex: IF EXIST C:\demo
3. 但路徑若有空白,則必須加雙引號


B. PATH為變數+字串的路徑
 ex: set apk_path="C:\demo"
  %apk_path%child_path

1. 在win7 sp1(6.1.7601)版本之後,可直接使用%變數%字串
 ex: IF EXIST %apk_path%child_path
2. 在win7(6.1.7600)版本及更舊,必須使用"%變數%字串"
 ex: IF EXIST "%apk_path%child_path"

2013年5月11日 星期六

[Java] Two-phase Termination

小朋友總是把玩具散落一地. 晚上到了睡覺時間, 媽媽會說 “快把玩具收好, 再去睡覺喔”, 這時小朋友停下來不玩並開始收拾玩具.

開一條thread,在thread中判斷何時要終止自己的thread
並在終止之前做一些處理


※補充說明 :
不可以使用 Thread 類的 stop 方法: java.lang.Thread 類有一個用來強制結束掉線程的stop 方法. 但是現在stop 已經不被建議使用 (depreciated). 原因是 stop 方法會使實例喪失安全性的保障. 使用 stop 方法時, 線程會拋出 java.lang. ThreadDeath 異常而馬上結束. 即使線程再執行某些 critical process.

refs1: http://openhome.cc/Gossip/DesignPattern/TwoPhaseTermination.htm
refs2: http://puremonkey2010.blogspot.tw/2010/10/java-two-phase-termination-pattern.html

2013年4月29日 星期一

[Language][JAVA] MVC概念


MVC(Model-View-Controller)是軟體工程上面的一種軟體設計模式,目的即是將程式與設計做一個區隔,創造一個權責分明的開發架構,透過分層的切割,讓「視覺設計師專心做設計,程式設計師專心寫程式」,使開發上更能模組化及提高可維護性,其做法是將應用程式分割成以下三個邏輯元件:
  • Model-主要負責應用程式中的商業邏輯(Business Logic),商業邏輯是一個非技術用語,用來描述應用程式功能性的演算法以及資料庫與使用者介面之間的資料交換。Model封裝了應用程式中對資料的存取並提供可重複使用的函式庫,舉凡資料庫存取的抽象化,郵件的遞送,資料的驗證與稽核都會在此進行。
  • View-簡而言之,即是我們用來呈現Model取得的資料與蒐集使用者互動資料的網頁,HTML / CSS / JavaScript都是使用於此層的技術。
  • Controller
    • 蒐集使用者於View中所輸入的資料並決定由哪一支程式進行資料的處理。
    • 接收Model所回傳的資料並在解析後傳遞給View作呈現。
    • 所有程式的例外處理以及流程控制。


refs: https://ascc.sinica.edu.tw/iascc/articals.php?_section=2.4&_op=?articalID:4311

JAVA MVC example
refs: http://www.leepoint.net/notes-java/GUI/structure/40mvc.html

2013年4月23日 星期二

[Git] 開branch日常使用

1. 以某個tag為基礎建立新branch
$ git branch [branch_name] [tag]

2. 切換到新branch
$ git checkout [branch_name]

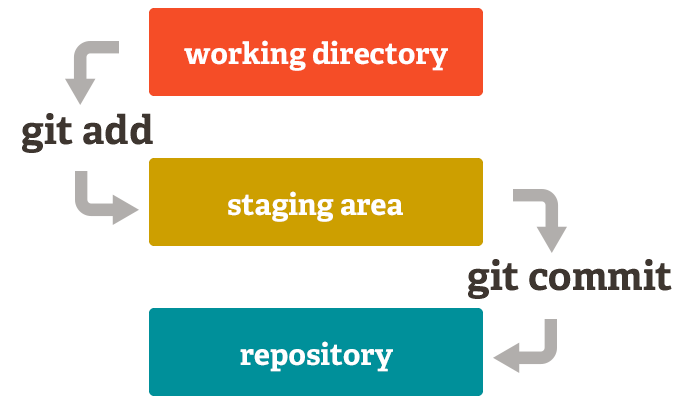
3. 建立檔案並打commit
$ git add
$ git commit

4. push到server (也順便在server建立此branch)
$ git push origin [local_branch_name]:[server_branch_name]
ex: git push origin v1:v1

2013年4月19日 星期五

[Linux][ShellScript] 輸出空行

輸出空行的方式有兩種
1. echo -e "\n"
2. echo ""

若是沒有-e的話,\n會當成字串輸出

2013年4月8日 星期一

[Android] 分析This Handler class should be static or leaks

好文章,留著筆記:http://www.beyondcompare.cn/this-handler-class-should-be-static-or-leaks.html

重點擷取以下:

Handler作为Activity的内部类有可能会导致内存泄露的问题。
Handler类应该应该为static类型,否则有可能造成泄露。在程序消息队列中排队的消息保持了对目标Handler类的引用。如果Handler是个内部类,那么它也会保持它所在的外部类的引用。为了避免泄露这个外部类,应该将Handler声明为static嵌套类,并且使用对外部类的弱应用。

package cn.beyondcompare.statichandlerdemo;

import java.lang.ref.WeakReference;

import android.os.Bundle;
import android.os.Handler;
import android.os.Message;
import android.app.Activity;

public class MainActivity extends Activity {

 MyHandler handler = new MyHandler(this);

 @Override
 public void onCreate(Bundle savedInstanceState) {
  super.onCreate(savedInstanceState);
  setContentView(R.layout.activity_main);
  test();
 }

 static class MyHandler extends Handler {

  WeakReference mActivity;

  MyHandler(MainActivity activity) {
   mActivity = new WeakReference(activity);
  }

  @Override
  public void handleMessage(Message msg) {
   MainActivity theActivity = (MainActivity) mActivity.get();
   switch (msg.what) {
   case 0:
    theActivity.test1();
    break;
   }
  }
 };

 private void test() {
  handler.sendEmptyMessage(0);
 }

 private void test1() {
 }
}

2013年3月27日 星期三

[Git][Gerrit] 移動版本庫;從git移到gerrit


1. Gerrit先開project

2. 可看到目前遠端版本庫僅有origin
$ git remote -v

3. 在Gerrit Project中新增一個遠端版本庫git1
$ git remote add git1 ssh://git@10.109.39.56/home/git/git1.git

4. 可看到目前遠端版本庫有origin跟git1
$ git remote -v

5. 將git1的資料fetch下來
$ git fetch git1

6. 可在branch中看到remote的git1
$ git branch -a

7. 切換到master,並將remote的git1 merge進來
$ git checkout master
$ git merge git1/master

8. 上傳
$ git push

8.1 若是要將A branch push到B branch
$ git push origin [branch_a]:[branch_b]

2013年3月25日 星期一

[Linux] 多檔案一次取代文件字元

find -iname  "[file_name]" | xargs sed -i 's/[old_string]/[new_string]/g'

ex: find -iname  "note.txt" | xargs sed -i 's/adb/def/g'

2013年3月20日 星期三

[Android] 使用需系統權限的APP的方法

需要系統權限的APP預設安裝進去device
是無法取得系統權限的
需取得系統權限有兩種方法

1. sign與image相同的platform key
$ java -Xmx2048m -jar linux-x86/framework/signapk.jar -w keys/platform.x509.pem keys/platform.pk8 [unsigned_app] [signed_app]

2. 將app push到/system/app底下,APP即可取得系統權限
$ adb root
$ adb remount
$ adb push [app_name] /system/app


ref1:[Android] 查看Android device key:app sign key

ref2:[Android] 修改system權限

--

2014/2/7 note

key在codebase的build/target/product/security中

[Android] 修改system權限

/system的權限預設都為read only
若要修改權限,直接下chmod是無法改變權限的
需透過adb remount,將/system權限改為read. write

$ adb root
$ adb remount

=>補充:adb remount為重新將系統掛載為R/W模式

2013年3月15日 星期五

[Git] 取消git add


當不小心將檔案git add
要取消add的指令
$ git reset HEAD [file_name]

[Engineer] 工程術語:EVT-DVT-PVT-MP

EVT : Engineering Verification Test (工程驗證測試階段) 
一般這個階段所生產出來的樣品只有電路板,而且是那種很大一片的板子,我們通常稱之為【Big Board】,研發工程師通常會先把他想要驗證的想法或是無法決定的設計擺在這種板子上面。所以這種設計通常是硬體電路的工程驗證(verification)、除錯(debug)之用而已


DVT: Design Verification Test (設計驗證測試階段) 
這個階段的機構外殼可能一開始只拿一塊大的樹脂用雷射雕刻所製作出來的樣品(mockup),或是用軟模具所生產出來的產品而已,目的是希望在模具發包真正生產前,用來驗證機構外殼的設計是否符合需求。
這個階段要驗證整機的功能,重點是把設計及製造的問題找出來,以確保所有的設計都符合規格,而且可以生產。


PVT: Production Verification Test (生產驗證測試階段) 
這個階段的產品設計應該已經全部完成了,所有設計的驗證也必須告一段落。這個階段試產的目的是要做大量生產前的製造流程測試,所以必須要生產一定數量的產品,而且所有的生產程序都要符合製造廠的標準程序。


MP:Mass Production (導入量產階段)


refs: http://www.researchmfg.com/2010/07/evt-dvt-pvt/

[Git] 刪除Branch

1. 刪除local branch
$ git branch -d [branch_name]

2. 刪除local branch(強制)
當branch裡有commit,可能需要-D強制刪除branch
$  git branch -D [branch_name]

3. 刪除remote branch
$ git push origin :[branch_name]

2013年2月27日 星期三

[Android] 調整APP螢幕亮度

以下調整當下activity亮度
與系統的亮度沒有關聯

若要調整系統亮度的寫法
因需要系統權限,app需sign key
則會另開一篇文章分享

//=====================================

螢幕亮度的值為0-255

import android.view.WindowManager;

private void setBrightnessLevel(final int brightness_level) {
 WindowManager.LayoutParams lp = getWindow().getAttributes();
 lp.screenBrightness = Float.valueOf((brightness_level) * (1f / 255f));
 getWindow().setAttributes(lp);
}


[Android] string及R.String在textview的轉換

在Android中,字串可宣告在程式之中
也可宣告在strings.xml成為resource使用

以下範例列出
在使用textview.setText()中,要使用這些字串的方式
並列出若是使用html的效果的方式

分別兩者之中宣告變數
[程式]
private String hello = "Hello World";
private String hello_html = "<b>Hello World</b>";

[String.xml]
<string name="bye">Bye Bye</string>
<string name="bye_html">
<![CDATA[
<b>Bye Bye</b>
 ]]>
</string>

textview1.setText(hello);
textview2.setText(Html.fromHtml(hello_html));

textview3.setText(R.string.bye)
textview4.setText(Html.fromHtml(getString(R.string.bye_html)));


[Android] 讓textview顯示html效果

讓textview顯示html的效果,只要在setText內多加Html.fromHtml()

要使用的html效果可加在宣告string的內容中
也可直接加在Html.fromHtml()之中

private String status_result = "Please press PASS/FAIL button.";

textview_status1.setText(Html.fromHtml(status_result));

textview_status2.setText(Html.fromHtml("Please press PASS/FAIL button."));

textview_status3.setText(Html.fromHtml(getString(R.string.status_result)));

[Android] xml檔註記html的方式

若在strings.xml中,所宣告的string需包含html的格式
前後需夾註
<![CDATA[
]]>

  <![CDATA[
        Please press PASS/FAIL button.
        ]]>

2013年2月21日 星期四

[Gerrit][Git] path conflict的方法

Error Message:

Your change could not be merged due to a path conflict.
Please merge (or rebase) the change locally and upload the resolution for review.


紀錄,等待實驗..
http://cmc925.blogspot.tw/2011/12/your-change-could-not-be-merged-due-to.html
http://blog.csdn.net/wtysksk/article/details/8123639

--

130222 update
實驗過

1. 已經push change到gerrit
2. 在local端下git pull --rebase
3. 重新push到原有的change
$ git push ssh://[account]/[gerrit_project_path] HEAD:refs/change/[changeID]
4. 在gerrit中原有的change會顯示上了第二個patch

2013年2月18日 星期一

[Android] 強制開啟APP的方法


強制開啟APP的方法
$ adb shell am start -a android.intent.action.MAIN -n [Package_Name]/.[Activity_Name]

ex: adb shell am start -a android.intent.action.MAIN -n com.example.brightnesstest/.BrightnessTest

2013年1月29日 星期二

2013年1月10日 星期四

[Ubuntu][Linux] lftp 多線程下載

當連國外網站,或是下載速度很慢的時候
可使用lftp,用10條thread來下載
$ lftp -e 'pget -n 10 [download_path]'

2013年1月9日 星期三

[git] 取消已經暫存的文件

想要取消已經git add到暫存的文件
$ git reset HEAD [filename]


Extend Reading
想要刪除server的檔案
$ git rm [filename]

2013年1月8日 星期二

[Gerrit] [MySQL] 檢查Gerrit上是否尚有open change

#! /bin/bash

project_name='test'

open_change=$(echo "SELECT change_key FROM changes WHERE (dest_project_name='$project_name') and (open='Y');" | mysql -u[account] -p[password] reviewdb --silent)

if [ ! -n "${open_change}" ]; then
    echo "It dose not exits changes on Gerrit."
    exit 0
else
    echo "It exits changes on Gerrit."
    exit 1
fi

[ShellScript] 判斷變數為空


1. 變量通過" "引號引起來

如下所示:,可以得到結果為 IS NULL.
#!/bin/sh

if [ ! -n "​​$para1" ]; then
  echo "IS NULL"
else
  echo "NOT NULL"
fi


2. 直接通過變量判斷

如下所示:得到的結果為: IS NULL
#!/bin/sh

if [ ! $para1 ]; then
  echo "IS NULL"
else
  echo "NOT NULL"
fi


ref:http://blog.csdn.net/lllxy/article/details/3255554

2013年1月7日 星期一

[Ubuntu] 解決找不到ServerName的問題

解決每次重啟Apache2會有找不到ServerName的問題

apache2: Could not reliably determine the server's fully qualified domain name, using 127.0.1.1 for ServerName

1. 修改httpd.conf這個空文件
$ sudo vi /etc/apache2/httpd.conf

2. 將以下內容複製進去
ServerName localhost