1). 在local端新增tag
$ git tag -a [tag_name] [commit_id]
2). 在remote端新增tag
$ git push origin [tag_name]
$ git push origin --tag (一次將所有tag push上去)
3). 在local端刪除tag
$ git tag -d [tag_name]
4). 在remote端刪除tag
$ git push origin :refs/tags/[tag_name]
//======================================
9/4新增repo的部份
在repo codebase之下的用法
1). 在local端新增tag
$ repo forall -c 'git tag [tag_name]'
2). 在remote端新增tag
$ repo forall -c 'git push --tags'
3). 在local端刪除tag
$ repo forall -c 'git tag -d [tag_name]'
4). 在remote端刪除tag(需取得gerrit權限,目前沒嘗試過)
$ repo forall -c 'git push origin :refs/tags/[tag_name]'
2013年9月4日 星期三
2013年8月26日 星期一
[Gerrit] 解決Gerrit 2.5版本以上gitweb "404 no projects found"
Gerrit 2.5版以上有即使在All-Projects設了refs/*->read:allow
Gitweb仍舊會"404 no projects found"的bug
workround
在refs/meta/config->read:allow Project Owners
取消Exclusive的勾選
雖然被設定可讀權限的人可修改project access的狀況
但會以等待review方式呈現,且無submit的權限
所以暫時可以這個方式作為workaround
※refs:http://blog.sina.com.cn/s/blog_4fb490ff01018i0v.html
Gitweb仍舊會"404 no projects found"的bug
workround
在refs/meta/config->read:allow Project Owners
取消Exclusive的勾選
雖然被設定可讀權限的人可修改project access的狀況
但會以等待review方式呈現,且無submit的權限
所以暫時可以這個方式作為workaround
※refs:http://blog.sina.com.cn/s/blog_4fb490ff01018i0v.html
2012年5月29日 星期二
[Repo] note
● repo的流程:
1). git init -u [site] 會將設定檔及source code的server型態,下載到project_dir/.repo中
2). 若有需要,修改project_dir/.repo/manifest/default.xml
此會決定要下載哪些project,版本分別是什麼
3). 再到project_dir/platform中repo sync
source code就會從server型態轉成git型態,此步不需要網路連線
server型態的存在project_dir/.repo/projects
裡面每一個.git都是一個git project
● git init 若加--mirror,出來的會是git server的型態
2012年4月25日 星期三
[repo] 安裝repo
安裝repo
1). 設置環境變數
mkdir ~/bin
PATH=~/bin:$PATH
2). 下載repo
curl https://dl-ssl.google.com/dl/googlesource/git-repo/repo > ~/bin/repo
3). 將repo設為可執行
chmod a+x ~/bin/repo
---
Initializing a Repo client
1). 創建資料夾
mkdir WORKING_DIRECTORY
cd WORKING_DIRECTORY
2).initial一個repo cilent
repo init -u https://android.googlesource.com/platform/manifest
3). 切換到master branch
repo init -u https://android.googlesource.com/platform/manifest -b android-4.0.1_r1
4). 同步
repo sync
2012年1月30日 星期一
[Repo] Get code機制
[Repo的Get code機制]
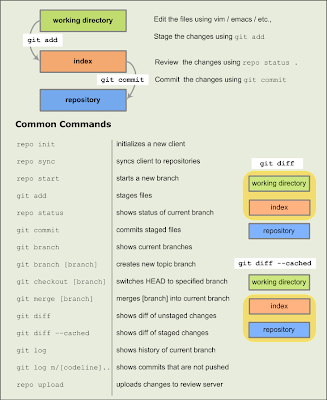
1). repo init
initializes a new client
2). repo sync
syncs client to repositories
※example:
1). repo init –u [網址] –b [revision]
2). Modify /.repo/manifests/default.xml
3). repo sync
※Reference:
http://source.android.com/source/version-control.html
http://lormann-pilot.blogspot.com/2011/06/repo-sync-git-code-database.html
1). repo init
initializes a new client
2). repo sync
syncs client to repositories
※example:
1). repo init –u [網址] –b [revision]
2). Modify /.repo/manifests/default.xml
3). repo sync

※Reference:
http://source.android.com/source/version-control.html
http://lormann-pilot.blogspot.com/2011/06/repo-sync-git-code-database.html
訂閱:
意見 (Atom)